The expense report profile defines how to input and reimburse an expense report. It also groups together the possible expenses types, each with its own settings, but also has its own specific settings.
Each employee can have one or more expense report profiles.
For example, a sales man will have profile 'Sales' that will allows him to invite external clients to the restaurant and a profile 'Training' that he will use to declare his expenses when he goes on a training course, in which he won't have the option to to input 'external invitees'.
Who is concerned by this article?
The administrator as responsible of Eurécia configuration.
Create or edit a profile
Access : Admin Area > Expense reports > Open Profiles and Group
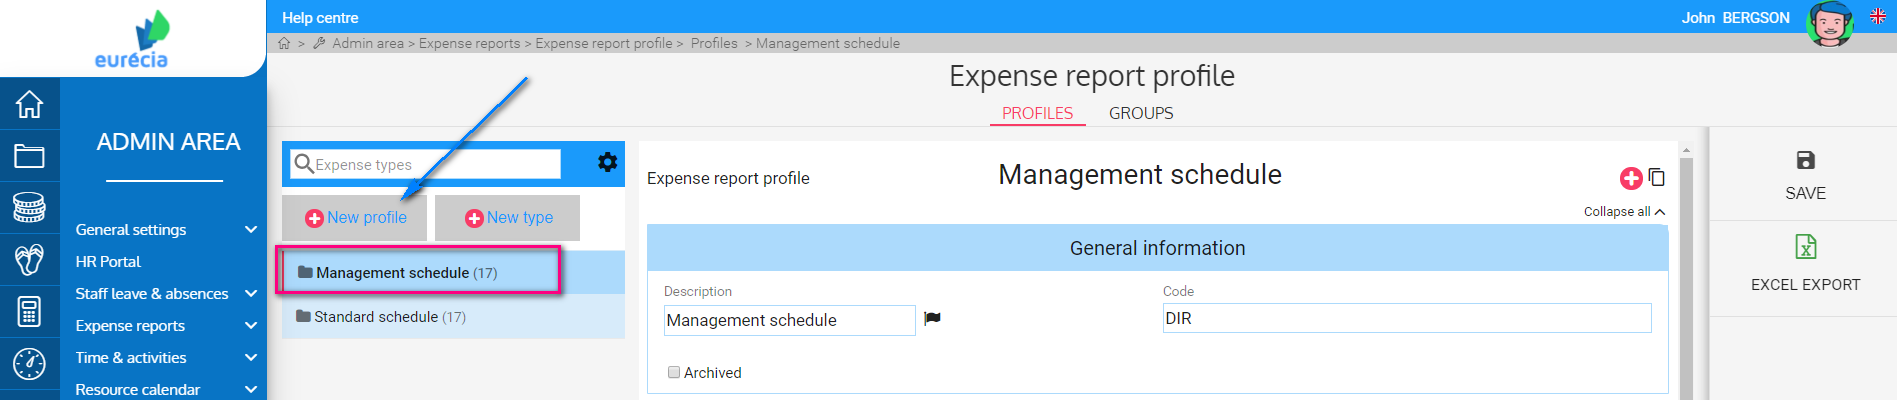
- Click on the existing profile or click on 'New profile'
- Then, appears the settings of the expense reports profile

General information
In this section you can fill-in a name in 'Description'

- Click on the flag next to the name to translate it in different languages.
- Enter a code: it is useful during the import of employees to assign them a profile and in case of a configuration import.
- If you want to archive the profile check 'Archived'
Expense report frequency
In this section you can configure the frequency of expense reports creation.
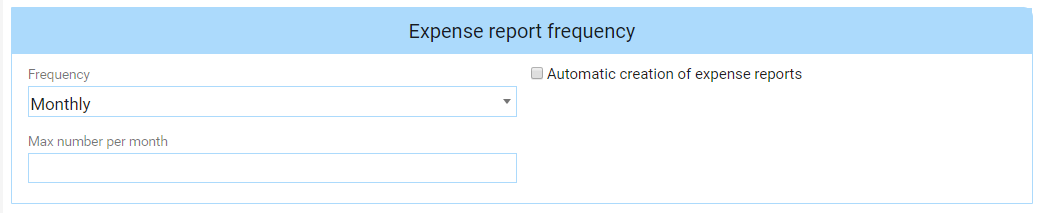
- Chose the input frequency: it allows to define the period:
- Monthly : the employee will select the month concerned by his expense report (from the first day of the month to the last, usually)
- Weekly : the employee will select the week concerned by his expense report (from Monday to Sunday, usually)
- Open : the employee will enter the dates he wants when creating an expense report
- If the frequency is monthly or weekly, check 'Automatic creation of expense reports' and fill-in 'Number of expense reports' to anticipate. Expense reports will create automatically, empty; and the employees will only have to fill them in. For example, if you input '2', the software will create automatically the expense report of the month and those of the month to come.
- Fill-in 'Max number per month' to avoid employees creating many notes rather than grouping their expenses in one or two notes
Expenses input
This section allows to configure the expenses input.
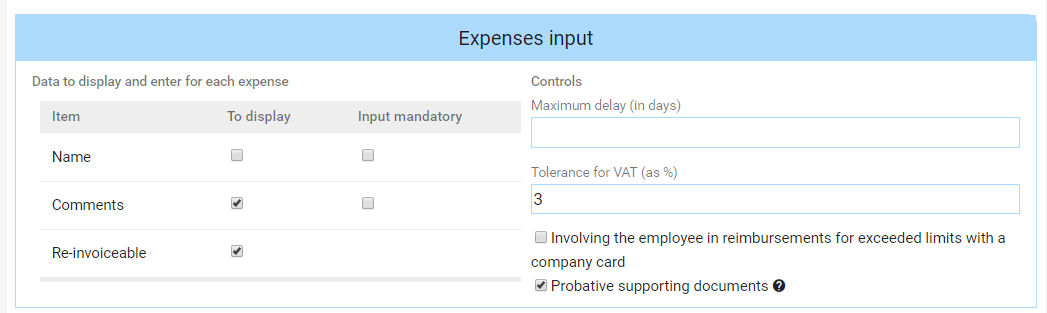
- Data to display and enter for each expense:
- Name : name of the expense (for example, the name of the restaurant etc.)
- Comments : complementary information
- Re-invoiceable : if expenses can be invoiced to a third person (customer, supplier, etc.), the value entered by users will be available in some exports
- Controls : allows to configure options and restrictions
- Maximum delay (in days) : allows to define the number of days the employee has to input his expense according to the date of the expense
- Tolerance for VAT (as %) : allows to limit errors when VAT is filled-in manually by the employee by checking the coherence between the VAT and the total amount (tax included) (a 3 % tolerance is enough)
- : allows the authentication of supporting documents in order to give them legal value and to get rid of the paper document
Mileage of professional vehicles
This section allows to configure the method of tracking the mileage of professional vehicles for the employees assigned to this profile.

- Check 'Enable tracking' to enable the feature
- The following fields (automatically calculated or filled-in manually) appear in a specific expense of the expense report:
- Odometer reading (km) 'Start'
- Odometer reading (km) 'End'
- Number of kms 'Pro'
- Number of kms 'Personal'
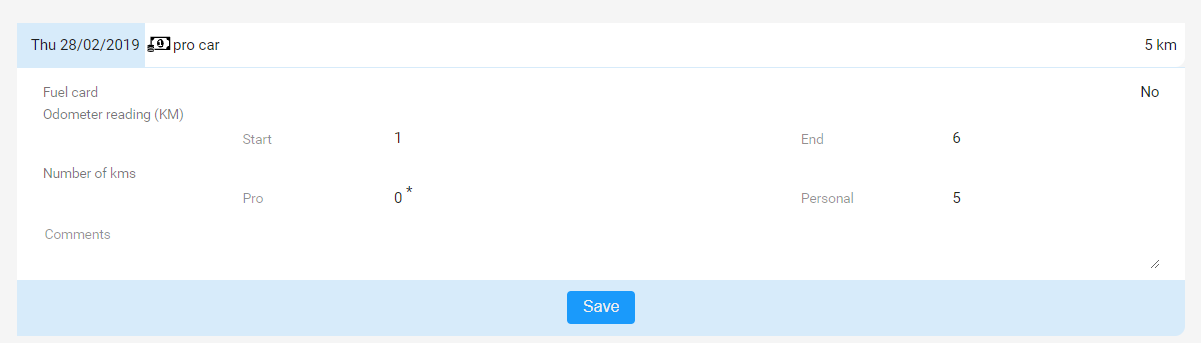
- Check 'Input mandatory' to make the input mandatory
- Check 'Initial mileage can be modified' to allow the employee to edit the initial mileage
- Check 'Calculate personal kms' to:
- Block the input of 'Number of kms Pro' and 'Number of kms 'Personal'
- Automatically calculate the difference between Start odometer reading km and End odometer reading km
- Display the result of personal kms
- Supply the professional kms with the entered expenses of the type "Km expenses" with a kilometric expenses schedule other than "personal kms".
- Disable 'Calculate personal kms' to:
- Block the input of 'Odometer reading (km) 'End''
- Allow the input of 'Number of kms Pro' and 'Number of kms 'Personal'
- Automatically calculate End Odometer reading (km) + Start Odometer reading (km) + 'Number of kms Pro' +'Number of kms 'Personal'
- Display the result of End Odometer reading (km)
- Check 'Include the employee in the expenses for personal kms' so that the employee can contribute financially to the personal kilometers driven with his professional vehicle. For example, the employee would have to pay 0.06 € / km. In this case, to know the amount of the employee's share, you must:
- Add an expense type in the expense report profile in 'Payment' section:
- Type = Km expenses
- Kilometer expenses schedule = personal km
- Ensure that a kilometer expense schedule is attached to the template 'personal km'
- Add an expense type in the expense report profile in 'Payment' section:
Expense report display options
It is possible to define if some elements has to appear in the expense report.

- Check 'Summary of the employer contribution breakdown' to display the total amount of the employer contribution to deduct. This contribution is calculated if the employee benefits from meal vouchers and that the expense types 'Meals' are configured in order to deduct the company contribution of the amount of the expense to reimburse.
- Check 'Expense report reference' to allows to input a complementary information that concerns the whole expense report.
- Check 'Fiscal horsepower of personal vehicle' if the user can edit the number of fiscal horsepower of his vehicle directly in the expense report for the expense type 'Km expenses' (otherwise, he will have to correctly fill-in his employee record with his personal vehicles)
Printout
It is possible to define if some of those elements has to appear in the printed expense report.

Check the following options :
- Expenses with zero amounts : to display all expenses even the ones with zero amounts
- Approval steps : to display information from the approval cycle of the expense report pour
- Supporting documents : to print, bu default, the supporting documents with the references
- Information for accounting purposes : to display recovery VAT and all information about accounting
- Signature fields : when a signature is asked
- Google Map : to print the maps when travels have been input via start and end addresses.
|
|
Once all the section have been filled-in, it is important to click on 'Save'.
To add expense types to the profile, consult this article: Create or edit an expense type.
Keywords associated to this article:
Expense reports - profile - Expenses - settings - impression - display - options - expenses input - mileage - professional expenses
Comments
0 comments
Article is closed for comments.